November 3, 2008

Country Living Special Holiday Collection Stampin' Kit

Stampin' Up is offering an amazing special now through December 31st (or while supplies last). Get more than $70 worth of products for just $49.95. Click here to download the brochure that shows all the goodies included.

The Holiday Collection Stampin' Kit includes the following products:

  • Holiday Collection stamp set (six stamps)
  • Four 12" x 12" sheets of die-cut chipboard
  • Eight 12" x 12" sheets of die-cut Designer Series paper (2 ea. of 4 double-sided designs)
  • Four 12" x 12" sheets of Designer Series paper (2 ea. of 2 double-sided designs)
  • Two 12" x 12" sheets of Whisper White card stock
  • 25 yds. Silver Metallic cord
  • 10 yds. 3/8" Whisper White taffeta ribbon
  • Pretties Kit brads (20)
  • Stampin' Dimensionals
  • Dazzling Diamonds Stampin' Glitter (1/2 oz.)
  • Tombow Multi Purpose Adhesive
  • Riding Hood Red Classic Stampin' Spot
  • Old Olive Craft Stampin' Spot
  • Uninked Stampin' Spot
  • Whisper White Craft Ink refill
Contact me to place an order for this special and other Stampin Up! products.

October 10, 2008

Celebrate Friends Class


In this class, you will make a wall hanging to celebrate your friends. This is a cheerful decoration to remind you of the wonderful friends in your life. Please bring three photos to work with. You have two options:
  • For $22, you will get everything you need to make the wall hanging.
  • For $40, you will also get the Stampin Up Priceless stamp set. See pic below of the stamp set. This set is worth more than $30 (cost of set plus shipping and tax).


Celebrate Friends Class


October 9, 2008

Happy Halloween!

I don't do much for Halloween. But my sister and her husband get really into it with homemade costumes and parties decked out with ghoulish decorations. I saw this foam Frankenstein face in the dollar-bin at Joann's and couldn't resist making a card for them. I added some orange Stickles to his cheeks and around the edges of the black mat. It was super easy and I think it's so funny to have this huge face on a card.

One Card a Month

I have a group of friends that I do arts & crafts with. We make a lot of cards so I organized a one-card-a-month swap. Each of us sends one card a month to various people involved in the swap. It's a nice way to get a little inspiration and happy mail each month.

Here are two of the cards I received in the last couple months from my friends Tracy and Deborah. I love Tracy's gatefold card with the tea cup images and charm. I really like gatefold cards; but I'm usually too lazy to make them myself. Ü Deborah is fabulous at sewing so it was fitting that she sewed on her card. It was extra fun to get this card, because she used some ribbon that I gave her. It's such a great swap!

October 4, 2008

New All-Occasion Card Class

On Friday, October 17th, in San Jose, I will be teaching my latest class -- a set of five thank you, birthday, and all-occasion cards made with Stampin Up papers and stamps. You will do a little stamping. Everything will be precut and ready to assemble. Easy, breezy, and fun! The class is $15 to make one set of cards. I can also send you a stamped, ready-to-assemble card kit for $15 plus $2.50 for shipping.

You can pay for the class with cash or check at the class or with a credit card by clicking the button below. You do not have to have a PayPal account to pay with a credit card: when you go to checkout, look for the link on the bottom left to continue without an account and simply enter your credit card information like you would at any other online store.


Class Kit


October 1, 2008

World Card Making Day Special: October 4-11

  • To celebrate World Card Making Day, enjoy 20 % off a wide variety of fun and colorful Simply Sent Card Elements and easy-to-use Simply Sent card kits.
  • See pgs. 176-177 of the Fall-Winter catalog; discount valid October 4-11. (Download the Stampin Up! Fall/Winter Idea Book & Catalog here.)
  • Contact me to place an order for these specials and other Stampin Up! products.

August 5, 2008

Looking for some inspiration?


I'm a big fan of SARK's books. She has a wonderfully vibrant personality that is reflected in her work. Be sure to check out her new book, Juicy Pens, Thirsty Paper, which is based on a workshop that she teaches to get your creativity flowing – a workshop that I'd really like to attend one of these days. Amazon.com is offering a special if you pre-order it now. I'm sure it will be yet another fabulous book from her.

June 15, 2008

My Sister at Work

I visited my sister at her work when I was home for the holidays a couple years ago. I got some really cute photos of her "at work." I love these photos. For this page, I used Doodlebug glittery chipboard letters, which is appropriate since my dad calls my sister "doodlebug." The patterned paper is Fusion from Autumn Leaves.

Mom's 60th Birthday

This is a layout about my mom's 60th birthday (a couple years ago -- I'm finally getting caught up on scrapbooking my photos!). I used Basic Grey's Blush patterned paper (except for the polka dot paper, which is from Chatterbox). I love the partridge. I normally don't use hearts for anything but I punched some for embellishments to match the hearts in the Basic Grey paper.

This was an experiment (I've been experimenting with different styles a bit lately). I normally don't place my photos cockeyed like this. But I was inspired by a layout I saw recently. It's also busier than I normally do. But I think it's fun and festive. I used a lot of Stickles to add some bling.

June 9, 2008

Father's Day Mini Album


My husband got a good laugh when he saw this mini album that I made for my dad for Father's Day. The photos are all quite unflattering of me. I guess we can classify them as being from "the awkward years." LOL

Making this was a real challenge for me. I didn't know what colors or embellishments to use, because I naturally gravitate to very feminine and girly stuff -- lots of flowers -- so I had to put on my thinking cap for this.

Father's Day Card

This is a Father's Day card that I made for my father-in-law. I used a Club Scrap "Greetings to Go" blank card, fern stamps (mostly Hero Arts), the CS Refresh print, and a CS greeting sticker.

Butterfly Card

I participate in a One Card a Month club. We each send one card to the various participants and receive one. I made this for one of the ladies. I put chunky glitter on the butterfly to add dimension and sparkle.

Bon Voyage Card

I made this for a friend who left her job. The paper is Blue Hill by Crate. I love the partridges! The heart frame and chipboard flower were in my Self-Addressed May kit. "Bon Voyage" is a rub-on from 7Gypsies.

Bloom Graduation Card

This is a graduation card that I made for our niece Mary. I didn't have any cap and gown stuff so I went with the idea of a person blooming after they planted the seeds of their studies.

Friends Layout


I made this after seeing a layout for a design challenge on the Making Memories blog. A designer there had created a layout that was inspired by the design of a magazine advertisement.

I used Chatterbox patterned paper, Prima flowers, an A Muse stamp (friends -- can't recall who makes the other stamps -- ack!).

May 24, 2008

Stampin Up Homemade Notepad


This afternoon I made a notepad with Stampin Up supplies. I covered two pieces of chipboard with Ginger Blossom paper to make the covers. Inside I put white and Certainly Celery cardstock sheets. I stamped the cover and some of the inside sheets with the Embrace Life stamp set. I attached everything with a metal ring, which I put ribbon on.

Rubber Stamp Ink Storage


The best way I know of to store rubber stamp inks, of which I have a ton, is with Mother Rubber Ink Pad Palaces. They're smartly designed, don't take up much space, and are very reasonably priced. Most ink storage is very expensive. But these cost soooooo much less and are very sturdy. They hold loads of ink pads so I can easily see them and sort them by color families. I use three and can always find exactly the right ink pad when I need it.

You can also store stamps and various goodies in them. She also has drawers that you can put in them, which are nice for storing little stamps that I use a lot.

The latest price on them is $11.49. She offers discounts when you buy more than one. This saves on shipping, too.

Marker Storage

To keep my markers from drying out, I store double-ended markers on their sides. This prevents the ink from flowing down into just one end. I store most of my markers that write on one end only upside down to keep the flow of ink moving toward the tip.

My favorite markers are from Stampin Up, because the colors are very vibrant and the ink flows really well.

My Craft Desk

IN PROGRESS... So this is the latest state of affairs on my craft desk in the midst of beginning a scrapbook page. I like to keep the desk more clear so I do that as much as possible before I start and after I finish. I find that I avoid the desk if it's a big mess. There's already so much going on in the room that I'm more inspired to work when I have a clean space!

TIDY VS. ON DISPLAY... So honestly, I prefer the look of everything being nicely tucked away when I see other people's super tidy spaces. But practically speaking, I find it more helpful for me to see my supplies when I'm working. Otherwise I forget what I have and then forget to use it.

SHOPPING AND CULLING MY STASH... Every so often I go through just about everything and cull out what I haven't used it. This is great, because I get rid of what I don't need and I'm reminded of the great stuff that I forgot I had so, in a sense, it's like going shopping each time I purge.

INSPIRATION ON HAND... Before I start every project, I look at other projects that I like to help me get inspired. I get stumped when I just look at a blank sheet of paper. Anytime I see something I like, I cut it out or print it. I find that it's useful to keep copies of projects that use stamps that I have with the stamps so I'm instantly reminded of the nice ways that other people have used the supplies I already have.

Homemade Notepad


I made this notepad with American Crafts paper on the covers and Club Scrap flower-textured paper (from the Nature's Wonder kit) for the inside paper. I covered sheets of chipboard with the American Crafts paper. I held it together with a metal ring and embellished the front with flowers from a Stampin Up multi-flower punch, Hero Arts flower-shaped jewels, and Heidi Swapp jewels.

May 10, 2008

Book of Me: Sonja


I've been experimenting with a style of scrapbooking that is more "free form" or bohemian than a lot of what I make. This is a photo of me when I was about a year and a half old. This page is for my book of me.

The flowery paper (which I hand cut), photo mat, swirl transparency (top left), jewels, and rub on (blue swirl on bottom right) are from the Bohemia line. White flower on top of the flower paper is Prima. The background paper on the bottom half is Lil' Davis Designs. Laser cuts at top left corner and that I used as photo corners are Karen Marie's (Plaid).

Cards for Chinese Students


A crafter friend is going to China to visit her son, who teaches university students there (mostly young women). She is taking several cards as homemade gifts from the U.S. These are some of the cards I created. I made most of them with bright, cheerful colors since those are very popular among young women in Asia.

Cupcake Card

Cupcakes have become amazingly popular. There are so many stamps out there now. This is a Hero Arts stamp (the cupcake and the phrase). I cut out the cupcake and mounted it to the card with a dimensional foam adhesive square. The card base (with the starbursts) is by A Muse.

May 8, 2008

Give a mile, take an inchie

"Inchies" are the hot new craze sweeping the scrapbooking world! There are so many people making them.

Never heard of 'em? Here's what they are... wee little, inch-sized canvases. Many people use heavy watercolor paper -- 140 lb. paper is the popular choice. And basically, you just do whatever you want and decorate as much as you can in this tiny space. Then people use them to decorate cards, frame them, whatever. Right now I'm participating in a swap of them so I should have gobs of them soon from friends. I plan to frame them and use some as magnets. Will be fun to see what people do.

This is a set that I made over the weekend for an online inchies class hosted by Lifetime Moments.

Two More for NSD

Here are two more scrapbook pages that I made over the weekend for National Scrapbooking Day (gosh, I wonder how much scrapbooking stuff is sold over this weekend -- must be like "black Friday" before Christmas!). For these I pulled out my Club Scrap supplies.

For "Handy," I used the CS Workbench kit papers, a CS big & tall alphabet stamp set, and some Phillips screw-style brads. For "Cooking," I used CS Fossils paper for the background, CS Painted Desert font for the title, CS Culinary stamps, CS Farmer's Market cardstock (the green print), and some Italian veggie papers, random red and cream twill tape.

May 3, 2008

Shell Earrings


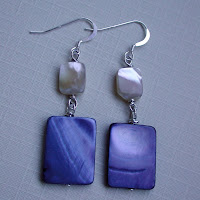
This is a pair of dangly earrings that I made with shell beads and sterling silver chain. I've got them listed on Etsy right now. I've sold some jewelry there and hope to sell some more!

Shell Earrings


This is a pair of earrings I made. I love to make jewelry, particularly earrings. I generally work with sterling silver and most frequently with shell. In San Francisco, we have some wonderful bead shops all over town. But I mainly go to two that are geared more to professional jewelry makers, because they have better selections and prices. Both are in SOMA: Beyond Beads and General Bead.

I've also been selling my wares on Etsy. It's an amazing site where people who make their own stuff can sell at very reasonable prices and reach a gigantic audience, because it's so popular. Here's my shop. Right now I'm selling a bunch of beads and supplies, because I'm doings some spring cleaning. :)

April 26, 2008

Birthday Gift for Dad (part one)


This is a birthday gift I made for my dad. More details and photos below...

April 25, 2008

Birthday Gift for Dad (part two)

I make a lot of homemade gifts. This is one that I made for my dad for his recent birthday. It's a wood block that I covered with Club Scrap patterned papers that represent different parts of his personality: the explorer, the teacher, the collector, the lover of life, and the family man. I used
  • for "explorer": papers, stickers, and stamps from the CS Time & Space kit
  • for "teacher": papers and stamps from the CS Science kit
  • for "collector": papers and stamps from the CS Fossils kit
  • for "family man": papers from the CS English Garden kit, Making Memories rub-on letters and "Love" stamp
  • for "lover of life": papers from the CS Aromatherapy kit and Stampin Up stamps
I applied the papers with Club Scrap's bookbinding glue to make sure the papers were really stuck to the wood. After I applied all the papers and stamped them, I applied Mod Podge decoupage glue to seal everything. Then I added some dimension with various doodads: the seashell, metal charms, a watch part, etc. I just mailed it to him and can't wait to hear what he thinks. :]

Luggage Tag


I got some epoxy dimensional clear tag stickers recently so I decided to make a luggage tag for my craft tote. First I applied some SEI butterfly and flower (the row of three orange flowers) rub-ons onto white cardstock. Then I stuck on the epoxy sticker. But I felt it was missing something so I added some plastic-y flower stickers randomly placed all over to cover most of the tag. And so the back didn't look plain, I adhered pink cardstock and rubbed on another SEI flower on that. Voila!
Related Posts with Thumbnails